In a nut shell, you will remove the seat, rear tank mounting bolts and the 10mm bolt as well. The area with the elongated holes on the deflectors are to slide under the rear tank mount that also has elongated holes on each side. Line up the elongated holes, one on top of the other. Bolt them down. Bolt in 10mm as well. Bottom trailing end of right deflector goes behind right side cover. Reinstall seat go for a ride.
2008 - 2013 Touring Models 2009 - 2013 Tri-Glide Model
First Remove the
Seat. Do Not remove the Side
Covers. Make sure if there are any other type of heat deflectors, they MUST be
REMOVED
Starting on the right side of your motorcycle. Observe how the right Side
Cover is mounted. There are 3 tabs molded to the inside of the side cover. These
tabs have been pressed through 3 rubber grommets on the motorcycles frame, two
places at the top and one place at the bottom. Placing your finger tips around
the bottom of the side cover, pull it loose from it's lower
mount ONLY and leave it be for now.
Note:
Later during your installation you will be
required to push the Side Cover closed at it's base.
This will trap the trailing end of the right heat deflector between the
backside of the Side Cover
and the frame tube of the motorcycle's frame, thus locking the deflector
in position.
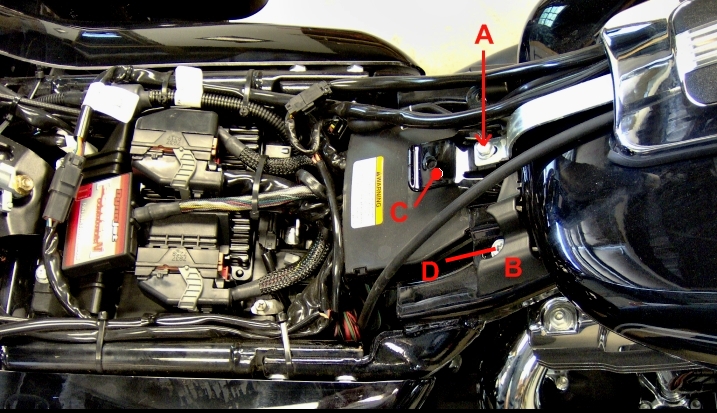
With the seat removed. Take
notice of the areas we have lettered for your installation.
(A)
10mm bolt
(B) Cosmetic Plastic Cover
(C)
Seat Catch & Rear Tank Mounting Bracket
(D) 2 Rear Tank
Mounting Bolts.
(A).
Remove this 10mm bolt and set aside to be reused.
By removing (A) this will
allow (B) to be moved around if
needed when installing the Heat Deflectors.
(B)
is used solely
as a cosmetic cover that hides the bolt heads(D)
of the rear tank mounts
from being seen after the seat is reinstalled.
(C)
is the Seat Catch.
(D) is one of the 2
rear tank mounting bolts.
Now remove both rear tank bolts.(D)
Set these to the side to be reused.
After removing the
2 rear tank
bolts.
Insert a large screwdriver handle underneath the seat catch(C)
as shown in the picture below.
The screwdriver makes it easier to lift the Rear of the Tank for insertion
of the deflectors beneath the
two elongated
openings that
the Tank mounting bolts
(D)
were
bolted through.
Using the screwdriver as a lever is especially helpful when the tank is full
of gas.
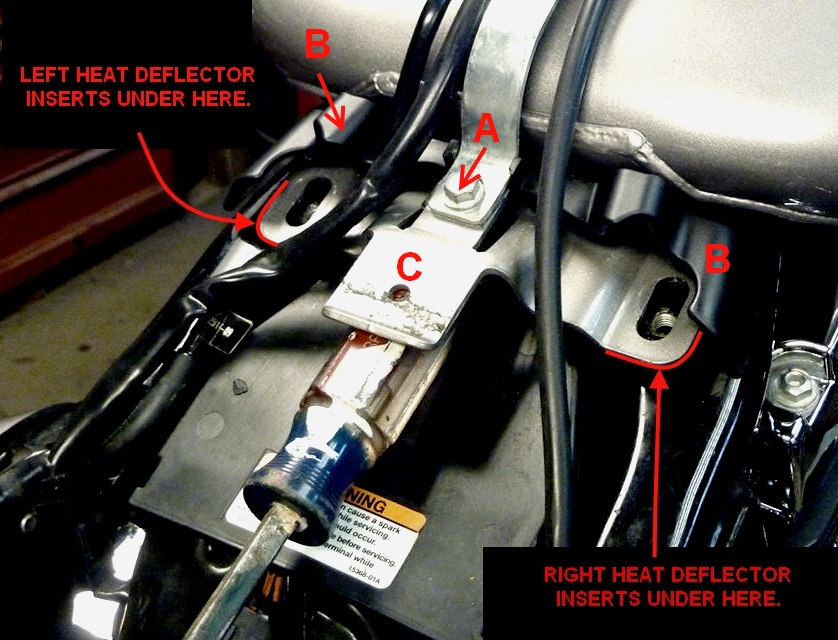
In the picture above. Take notice of the
threaded hole seen down within the elongated hole of the seat catch
(C).
The right Heat Deflector
(which is the larger of the two heat deflectors), also has an elongated hole as
well.
Insert the right heat deflector underneath the seat catch(C).
You may have to grab hold of the screwdriver by the metal shank and lift
it as a lever to raise the back end of the Tank allowing the front of the Tank
to pivot on the front mounting bolt of the Gas Tank. Then line up the heat
deflectors elongated hole
with the elongated hole
of the seat catch(C).
With the elongated holes lined up, one on top of the other, this is the correct
position that the heat deflector should be in. The elongated holes allow for any
additional adjustment of the heat deflector's positioning at your discretion. Reinsert one of the Rear Tank mounting
bolts (D)
back into the threaded hole making it finger tight until
your satisfied with the deflectors position. Then tighten the bolt. The
positioning of the left heat deflector is done the same way, matching up the
elongated holes.
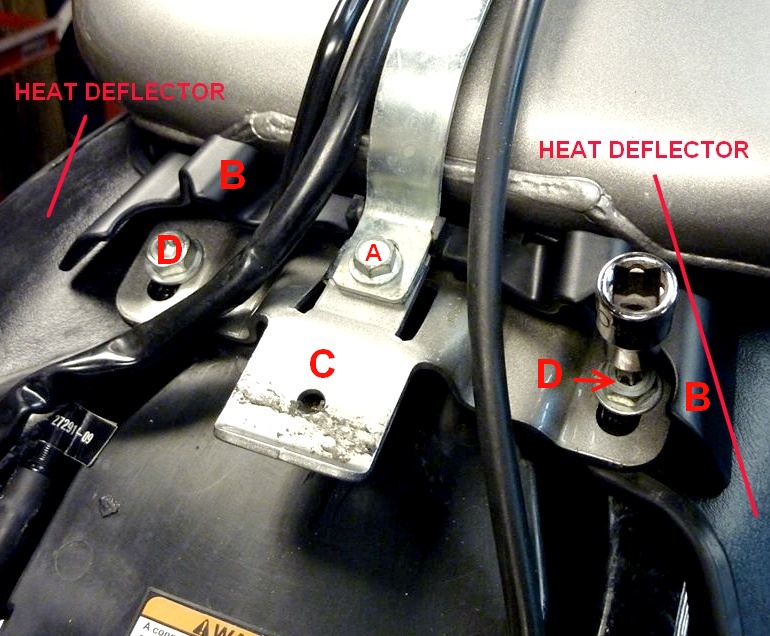
Looking at the picture below. You can see the Heat Deflectors have been
placed under the Seat Catch
(C)
which is also the rear mounting bracket of the Tank. After both Rear Tank
mounting bolts (D) have been tightened. You can now place the
10mm bolt
(A)
that you had removed before into it's threaded hole
holding that wide white metal strip that extends down from the Tank's center
console making sure to adjust the position of the Black Plastic Cosmetic Piece
(B)
before tightening the 10mm bolt.(A)
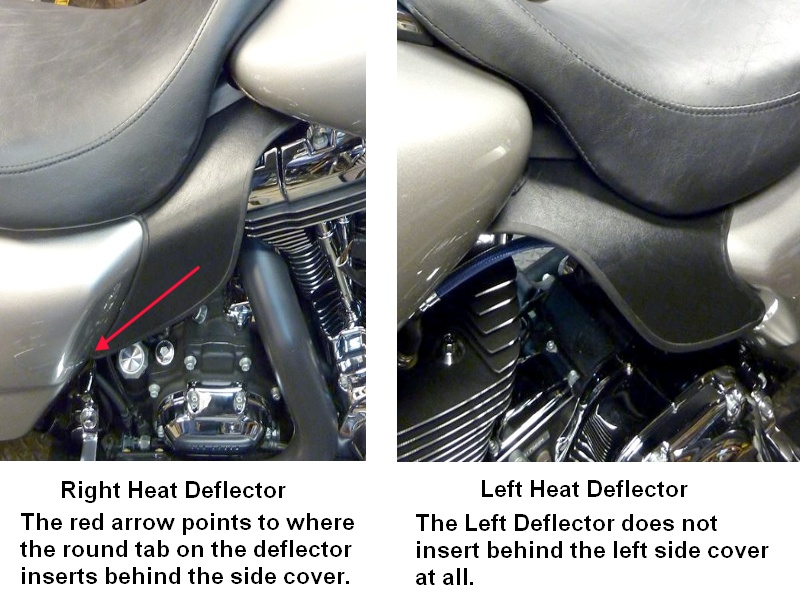
Take notice of the bottom trailing edge
of the right heat deflector.
You will see that it ends in a round shape. This is to be inserted
behind the right side cover. It will only insert in about a half of an inch.
While positioning the deflector's round tab behind the Right Side Cover.
You must then push the Side Cover closed, trapping the deflector between
the
back side of the Side Cover and the motorcycle's frame tube.
Important Note:
Since the characteristics of each side of your Harley aren't the same as
each other.
The insertion of the Right Heat Deflector is only performed under the
Right Side Cover.
The Left Heat Deflector DOES NOT mount under the Left Side Cover
at all.
The pictures below are how the
Heat Deflectors look when mounted correctly.
Even though the seat is mounted in the pictures.
Do Not mount your seat at this time.
Just take notice as to how the deflectors are situated against and along
the side covers
and their relationship with the other parts of the motorcycle.
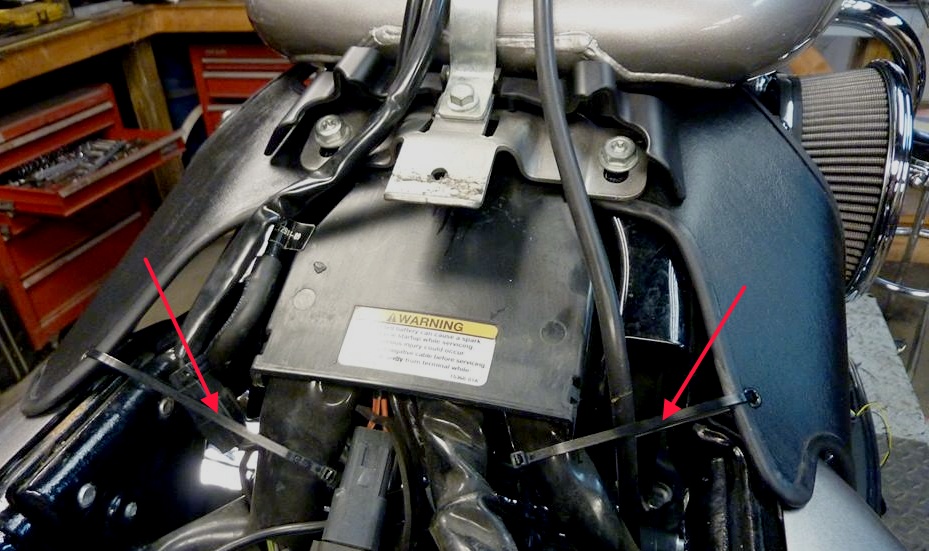
Viewing the picture below.
Use the two Tie Wraps supplied and secure the
heat deflectors through the eyelets and
around the cable harnesses pointed out by the red arrows. Just snug-up the
Tie Wraps, removing the slack The Tie Wraps
will keep the Heat Deflectors in position and against the upper surface of the
Side Covers. The Heat Deflector will not vibrate or rub against the painted
surface after your installation is completed.
Now reinstall the motorcycle's seat. When installing the seat you will notice that the seat will press against the surface of the Heat Deflectors. This allows the seat to act as a lock-down against the deflectors. Causing the deflectors to fit firm in their position. If need be, our deflectors are made of aluminum allowing for any tweaking by you of their fitment on your motorcycle
If you have any questions during your installation.
You can call us at 910-592-1585 any day of the week.